Doing your nails at home not only saves time and money but also offers a relaxing experience and the freedom to express your own style. Understanding this, Bee Honey – Massage in Da Nang shares simple, easy-to-follow, salon-quality nail tips so you can care for your hands right at home.With just a few basic tools and a little practice, you can turn a small corner of your space into a “mini nail studio” and achieve nails that look just as beautiful as those done in a salon.
Prepare your tools and clean your nails before doing nails at home
Before starting a DIY manicure, the most important thing isn’t the nail polish color or design you choose — it’s having healthy nails and properly prepared tools. This foundational step helps the polish adhere longer, prevents chipping, and protects your natural nails from damage.
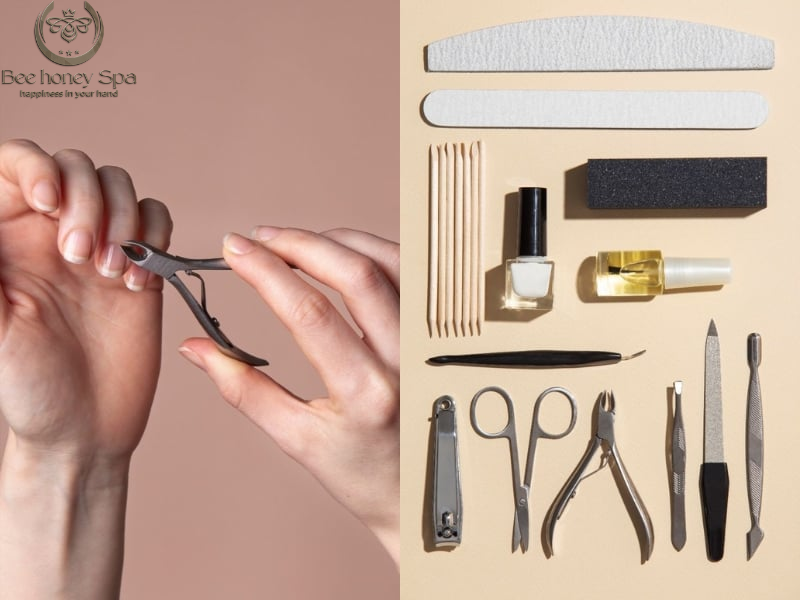
Prepare a basic nail kit for home use
To do your nails at home, you should have the following tools ready:
- Cuticle nippers, nail file, nail clippers: help shape your nails neatly and achieve the desired shape.
- Buffer: smooths the nail surface so polish adheres better and lasts longer.
- Nail polish remover / disinfecting alcohol: removes oils, dust, and old nail polish.
- Base coat, colored polish, top coat: the essential trio for durable, chip-resistant nails.
- Cotton swabs, cotton pads, finger tape: assist in cleaning up polish around the nail edges.
- LED/UV lamp (if using gel or chrome polish): helps polish dry quickly and last longer.
Clean and care for your nails before applying polish
A beautiful set of nails will not last if you skip the step of nail care. Follow these small but extremely important steps:
- Soak your hands in warm water for 3–5 minutes to soften the skin around the nails.
- Gently push back the cuticles and trim excess skin, avoiding force that may cause pain or damage.
- File nails in a single direction to prevent splitting or hidden breaks.
- Wipe off oils, lotion, or dust on the nails with alcohol — this tip helps polish adhere firmly and not peel after a few days.
- If you are not painting immediately, apply nail oil or cuticle oil to keep nails healthy and prevent dryness or breakage.
Step-by-step guide to doing your nails at home simply yet beautifully
To achieve beautiful nails without going to a salon, you can follow the steps below. They are easy to understand and don’t require many tools — just follow the sequence correctly, and your nails will be even, colorful, and long-lasting!
Step 1: Trim and shape your nails
Use nail clippers to trim your nails to the desired length. Depending on your preference, you can shape your nails square, round, oval, almond, or squoval. Be careful not to cut too close to the skin, as this can damage your natural nails or cause pain.
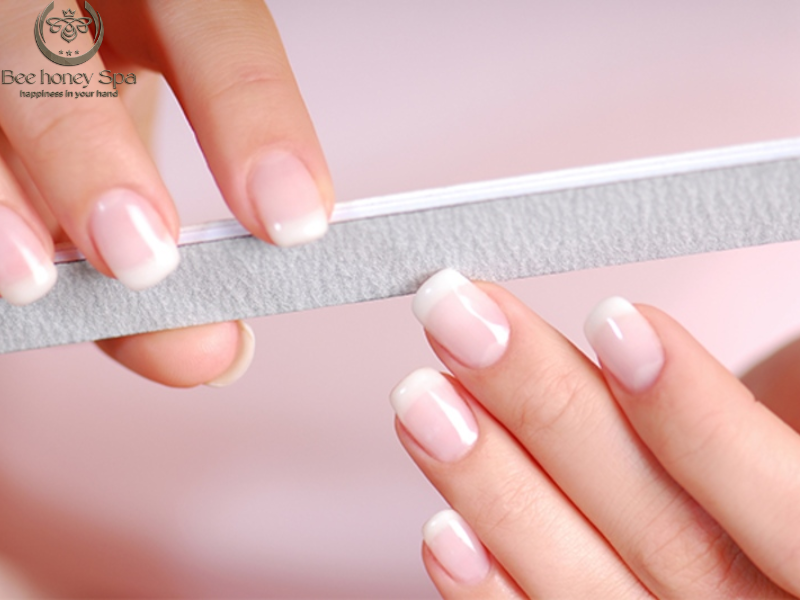
Step 2: File your nails for smoothness and evenness
After trimming, use a nail file to even out the edges and achieve the desired shape. When filing, file in one direction to avoid nail splitting. If you want a smoother and longer-lasting polish finish, you can also use a buffer to lightly smooth the nail surface.
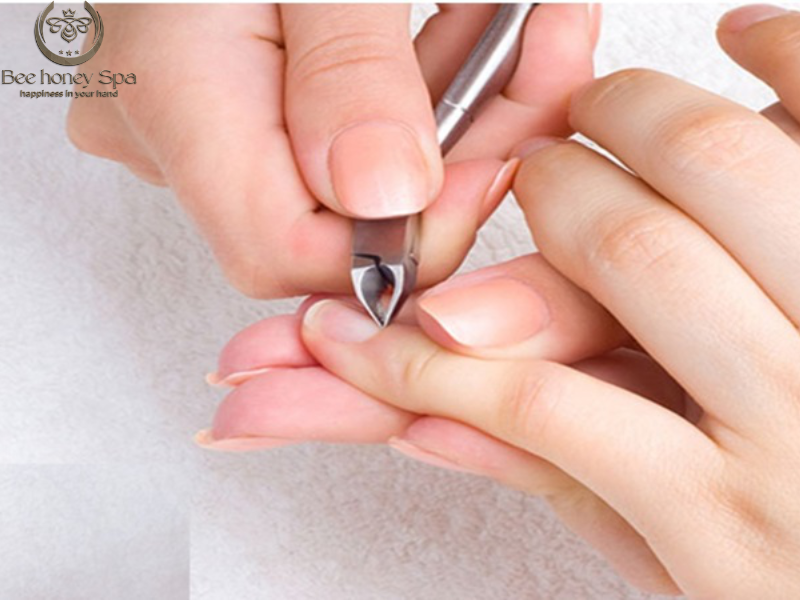
Step 3: Soak nails in warm water and remove dead skin
Soak your hands in warm water for about 3–5 minutes to soften the skin and cuticles around the nails. Then, use a cuticle pusher to gently push back excess skin. If necessary, you can trim the cuticle, but do so carefully to avoid pain or bleeding. Adding a few drops of essential oil or sea salt to the water will make your hands softer and more relaxed.

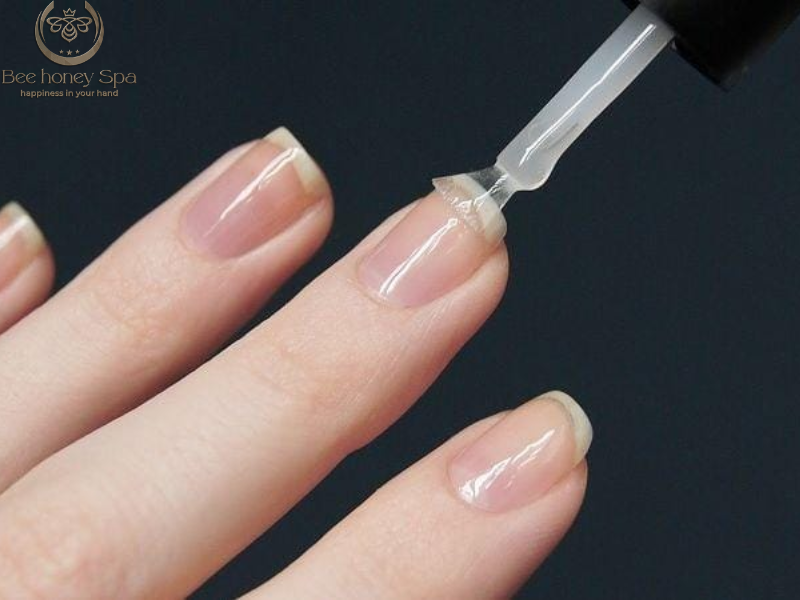
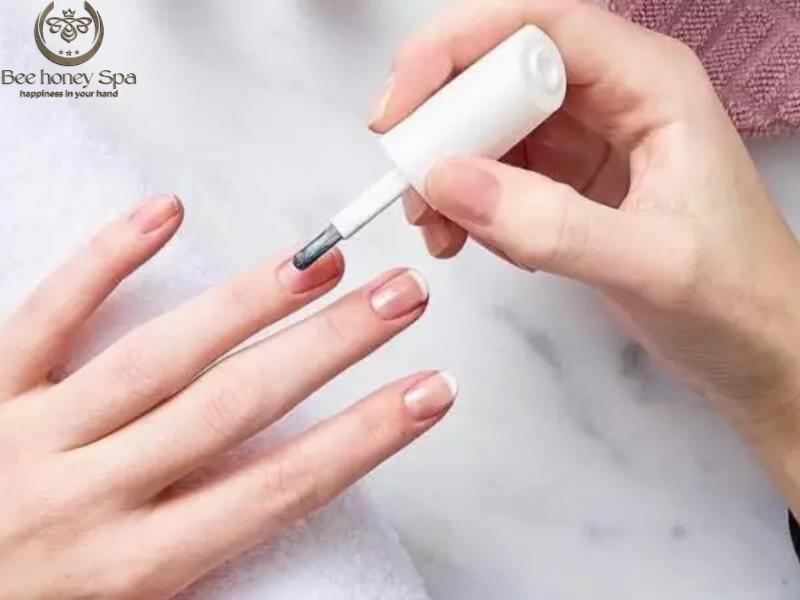
Step 4: Apply base coat
Before painting, clean your nails with alcohol or nail polish remover to remove oils and dust. Then, apply a thin layer of base coat to protect your natural nails, prevent yellowing, and help the color polish adhere better. If using gel, cure under a lamp; if using regular polish, let it dry for about 1–2 minutes.
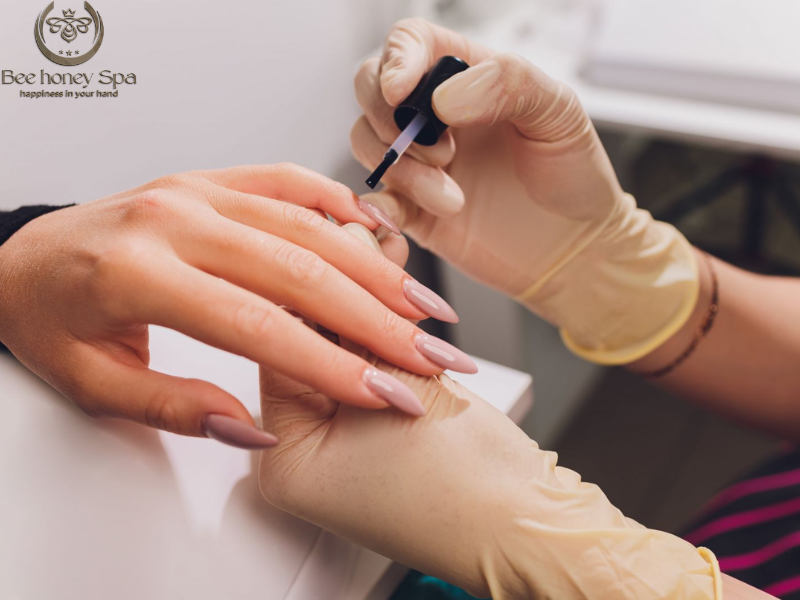
Step 5: Apply color coat
Shake the polish well before use, then apply a thin layer of color to avoid smudging. Once the first layer is dry, apply a second coat for more vivid and even color. If using gel polish, cure each layer under a UV or LED lamp for 30–60 seconds.
Step 6: Apply top coat
Finally, apply a top coat over the entire nail surface to seal the color, enhance shine, and protect against scratches. Cure under a lamp if using gel polish, or let it dry naturally for about 2–3 minutes if using regular polish.
Guide to simple and easy nail art you can do at home
If you want to do your nails at home without needing many tools or professional skills, here are a few simple yet effective nail designs that can make your hands look neat and pretty in just a few minutes.
- Checkered nail design: Start by applying a base color of your choice, such as white, nude, or pastel. Once dry, use a nail art brush or nail pen to draw horizontal and vertical lines, forming small checkered squares. You can mix and match colors like black–white, brown–beige, or pastel tones for a simple yet elegant look.
- Solid color nails: The easiest style that never goes out of fashion. Simply choose your favorite color, apply 1–2 even coats over the entire nail, and finish with a top coat. This style is quick, tidy, and versatile, suitable for school, work, or parties.
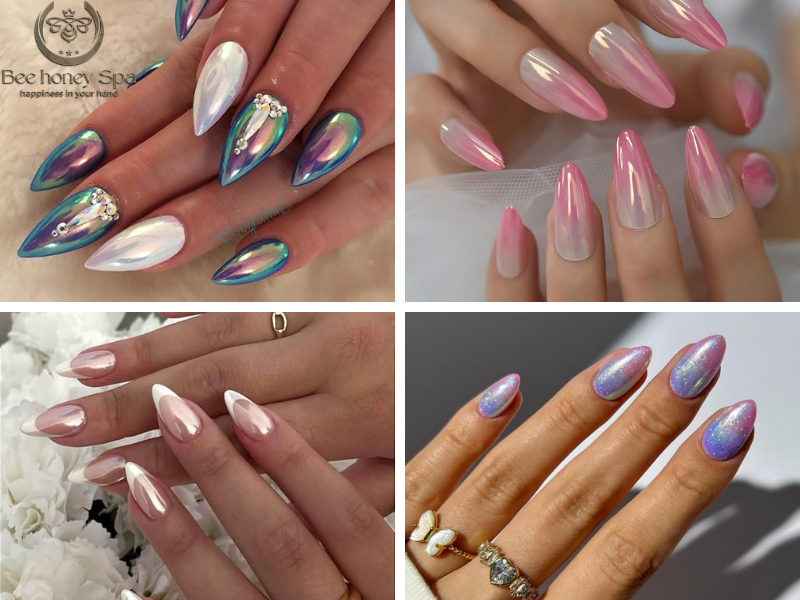
- French tip nails: A classic and always elegant style. Paint the nail base with nude or clear polish, then lightly paint the tips white. You can also get creative using silver, chrome, or pastel colors for a modern twist.
- Polka dot nails: After applying the base color, use a toothpick, nail brush, or dotting tool to make small dots on the nails. You can place them sparsely, evenly, or arrange them into flowers or hearts, depending on your creativity. This style is easy to do and suits a cute, playful look.
- Four-leaf clover nails: Paint a light base color, then use a brush or cotton swab to dot four small circles close together to form a clover shape. Add a tiny line in the center as the stem, and you’ll have a nail design that’s cute and symbolizes good luck.
- Gradient (Ombre) nails: A beautiful color-blending style. Start with a light base color, then use a makeup sponge to dab a darker shade onto the nails, creating a smooth gradient effect. Finish with a top coat to blend the colors naturally and give a glossy finish.
Tips and techniques to make DIY nails at home easier and more beautiful
Doing your nails at home isn’t too difficult if you know a few simple tips. These tricks will help your polish go on evenly, last longer, avoid smudging, and look more professional.
- Always start with clean, completely dry nails: Before painting, wipe your nails with alcohol or nail polish remover to remove excess oils. This helps polish adhere better and prevents chipping in the first 1–2 days.
- Apply thin layers — multiple layers are better than one thick layer: Don’t try to paint a thick coat on the first layer, as it can smudge or bubble. Apply each layer thinly, let it dry, then add another layer for more even and long-lasting color.
- Tip to prevent polish from smudging around the edges: Apply a thin layer of Vaseline or liquid latex around the nail edges. After painting, simply wipe off or peel the layer for clean edges without extra touch-ups.
- File nails in one direction to avoid splitting or breaking: Avoid sawing back and forth. File in a single direction to keep nails strong, smooth, and intact.
- Soak nails in cold water to speed up drying: After applying the top coat, wait 1 minute, then dip your fingertips in cold water for 2–3 minutes. This helps the polish dry faster and reduces scratches.
- Don’t forget to coat the nail tips: When applying the top coat, lightly paint the edges of the nail tips. This small trick helps prevent chipping at the tips after a few days.
- If you’re a beginner — choose nude, pastel colors or short nails: Light colors and shorter nails are more forgiving than dark colors or long nails, making them a safe choice for first-time home manicures.
Why choose Bee Honey Spa for your nails?
Getting your nails done isn’t just about polish or embellishments — it’s also a way to care for yourself, relax after a long day, and express your personal style. But to ensure your nails are not only beautiful but also durable and safe, choosing the right place to trust your hands is essential. This is why Bee Honey Spa is consistently loved and trusted by customers.
- Professional technicians with meticulous attention to detail: All technicians at Bee Honey Spa are highly skilled, knowledgeable about nail shapes, colors, and trends. Every stroke is carefully applied, ensuring your nails look flawless both up close and from afar.
- Safe products that protect your natural nails: Bee Honey Spa uses only genuine gel polish, acrylic powders, chrome powders, and nail care products that are safe for health. As a result, nails do not become yellow, dry, or weak after treatments.
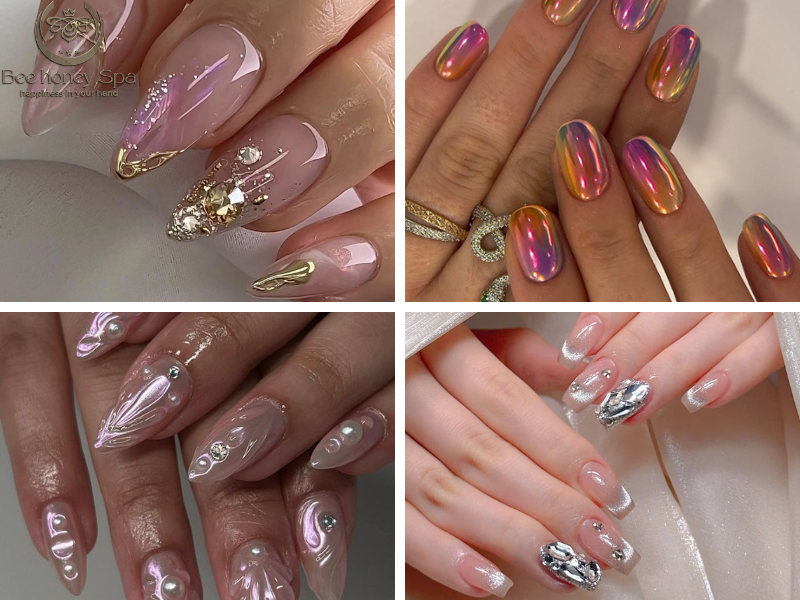
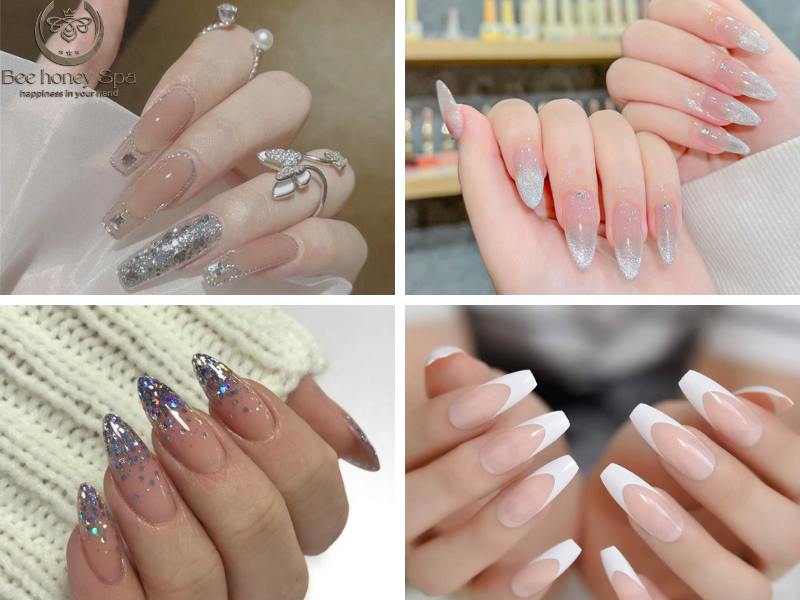
- Diverse nail designs, always up-to-date with trends: From soft Korean styles and luxurious mirror chrome nails to Swarovski crystals, 3D designs, ombré, and minimalist looks, the spa continually updates its selection so you can find the perfect style for your taste.
- Relaxing spa environment, gentle and cozy: Bee Honey Spa offers a calm and soothing atmosphere with light essential oil scents, clean spaces, and friendly service. It’s not just a beauty salon, but a place to recharge your energy.
- Reasonable pricing, clear consultation, no hidden costs: The spa provides pricing upfront and offers various service packages from basic to premium, suitable for different needs. You will always receive quality worth your investment.
Doing your nails at home not only helps you save time and money, but it’s also a way to relax, take care of yourself, and express your personal style. With the right tools, careful step-by-step application, and a few handy tips, you can easily achieve salon-quality nails right at home. At Bee Honey Spa, our professional technicians, safe products, and attentive care ensure you get beautiful, long-lasting nails without worrying about damaging your natural ones.